


1260 Memorial Drive
Atlanta, Georgia 30316
404-458-1330
Are You Into The Stocking Cap Method for Your Wigs?
Mikey MoranHave you ever sat back and thought about how far we have come as a society?
Regarding hair, of course.
The evolution of hair will always continue to amaze me, especially when it has to do with lace fronts. Before now, it seemed as if the only time you would see an HD lace frontal is on your favorite celebrity.
After all, the knowledge and ability to actually install a lace front correctly did not reach the masses until recently.

Also, lace frontals were quite expensive since most stylists didn’t offer the service. As far as hair extensions go, the HD lace closure was the wave that everyone needed to get on.
Now that lace frontals finally reached the limelight, we have a new wave that is here to stay.
If you thought lace frontals required a lot of maintenance, you were right! Every detail in the process of making it look as real as possible, matters.
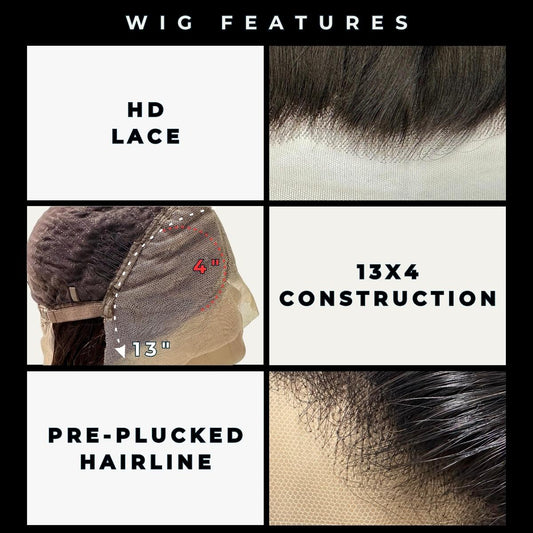
The edges, plucking the hairline, bleaching the knots and especially the stocking cap all correlate to create a look that is uniquely yours.
In the end, the results are gorgeous! A secure lace front begins with a good foundation.
Besides, you do not want your lace frontal lifting up or pulling back while you are giving a public speech in class. A stocking cap is necessary, to secure the foundation of your wig.
Better yet, a stocking cap method could be the solution to ensuring your hair entirely.

What is a Stocking Cap Method?
I don’t know how much time you spend on the internet, but if you've been on natural hair YouTube recently, you've probably seen a common trend used for lace frontals called the wig cap method or stocking cap method.
It involves a nylon stocking cap, gel and a lot of patience and time. The nylon stocking cap is also known as a wig cap.
It is a cap you were underneath your wigs to protect your hair.
Stocking caps keep it from moving or slipping, hold your hair in place, keep your scalp clean, and they collect your hair while it is falling out.
The Wig Need-to-Know
The hashtags “#whatlace” or “#whatfrontal” refers to the fact that the lace of a lace front looks so invisible, that it resembles a scalp.
The key most hair gurus point out in the YouTube tutorials is that their foundation is secure. That brings me to a few more detail on the stocking cap method.
From my research on YouTube and Instagram, most tutorials I have seen on the technique take at least an hour to apply.
You may be thinking it is just a cap so why does it take an hour to secure it?
Well from laying down the stocking cap to cutting the lace to setting the wig, it takes a reasonable amount of time to make sure it doesn’t move.
With all this trouble, I’d hope that you could wear this look for about a week. Unfortunately, it seems that you would have to perform this action every day.
That is a lot of gel!

How to Decide If You Need a Stocking Cap Method
The Basic Stocking Cap Method: For Best Results
Step One: Prepare the Wig
Analyze the properties that came with your wig.
Are the knots already bleached? Does the hair come with combs?
If you purchased one of Private Label's custom glueless wigs then you don't have to worry about bleaching the knots or combs. They come pre-customized.
Will you be using the combs? Know what you have so that you can work with it.
If you decide to bleach the knots of your wig, then pay attention to the type of bleach and developer you plan on using. By knots, I am talking about the cap that the hair follicles of the wig that it is attached to when making the hair.
When bleaching the knots, it is best to use a 30 Volume Developer.
Anything exceeding this amount needs to be monitored to make sure the bleach doesn’t burn the knots and damage the wig. After bleaching the knots, shampoo and condition the hair twice to rid of any excess bleach and residue.
Step Two: Style the Hair
After you bleach the knots, style the hair to your desired result.
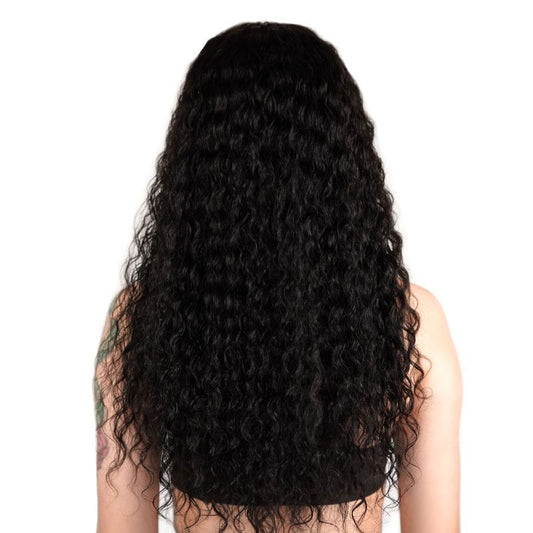
If you want curls, place rollers or pins in the sections of your hair.
To save time consider using bundles with a curly texture such as the deep wave or kinky curly bundles.
This styling process will prevent you from doing any extra work later since the stocking cap method can be time-consuming.
Step Three: BONUS
If you have an elastic band, measure it around your head and cut off the part that is larger than the perimeter of your head.
You do not need an elastic band for the stocking cap method, but it can add extra security for those who worry about wig slips.
I will be discussing elastic bands a little later in the posts!
Step Four: Time to get out your Stocking Cap!
Take out the stocking cap and analyze it.
For this method to work, your stocking cap needs to be as close to your scalp’s natural color as possible.
If the stocking cap is lighter than your scalp, use some powdered foundation and a brush to make it match more accurately.

Step Five: Now, It's Time to Prepare The Gel, Not Glue
Take the stocking cap and place it securely on your head, if you haven’t done so already.
From that point, take the gel you plan to use and rub the gel on the perimeter of your hairline, from ear to ear.
Make sure that your stocking cap is covering your hairline and that you are placing the lace hair glue on top of the actual stocking cap. It is okay if some of the gel touches your hairline, but that isn’t the purpose.
We want the gel to be mostly on top of the skin on your forehead.
If you put too much glue on your hairline, you could be at risk of pulling and tugging on the hairs. If you are not sure what gel to use, I suggest Got2B Glued Styling Gel.
It is safe, secure, contains natural ingredients and it comes off with regular water.

Step Six: The Drying Time
This next step ranges depending on who is giving you the method.
Some YouTubers tell you that the gel needs to be all the way dry, some will it needs to be at least 75% dry and some may even say you should leave it a little damp.
Depending on your preference and what works best for you, the options are endless.
Try it out for yourself! The main point is, you should continuously be blow drying your hair with your blow dryer on a warm to cool setting.
This process can take some time, so make sure you have plenty of patience and time on your hands.
Step Seven: You Need to Cut it!
Grab a pair of scissors and cut off the excess stocking cap that is not covered by the gel.
Pay attention to how flat it is in your head! You do not want the stocking cap to roll. Otherwise, the cap could move the lid off of your head and show your hairline through your wig.
Continue to cut any edges and lay down the cap flat to your head.
Feel free to use more gel on your stocking cap, but make sure you blow dry it again. Don’t worry it will not take as long to dry this time!
Step Eight: Grab your wigs, ladies!
Take your lace wig and secure the hair onto your head.
Line up the edge of your wig with the tip of the stocking cap. You should notice that the stocking cap is barely noticeable.
You should also see how natural the hairline looks against your wig and skin. Everything should look natural!

Step Nine: Style your hair, again!
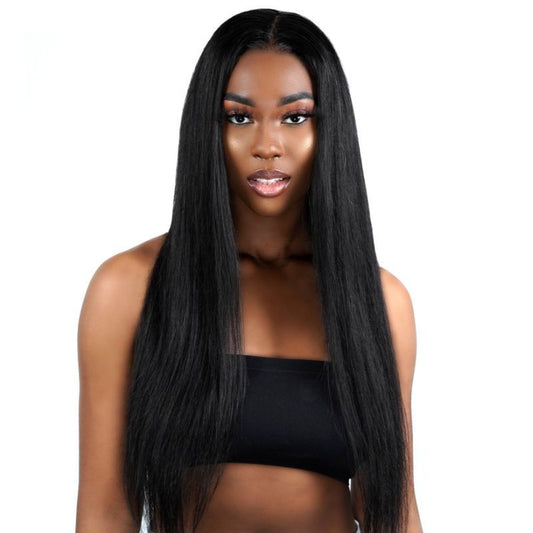
Fix up your human hair wig to your desired style.
If you had curls, take them down. If you need to straighten it again, now is the time to do so.
Make your wig look as natural and cute as possible because we do not want to worry about this part later.
Step 10: The Details Matter
When it comes to details, they matter.
One false move can ruin the entire foundation of the stocking cap and cause you to have to start the process over. For the parts of the stocking cap that is sticking out of the wig, go back over those parts with scissors.
If you fear that you may be chopping off your edges in the process, there is another way.
Use a wet paper towel to lift the parts of the stocking cap that is not inside the wig. Tuck those parts under your hair and secure the edges of your wig down with some more gel.
See, that wasn’t so hard! Style the wig to your liking and make sure that your gel is dry. Your wig should be as secure as your real hair.
Okay, maybe not that secure, but you should feel pretty confident knowing your wig will not come off.
We want our wigs to look as beautiful, natural and as reliable as possible!
Other Wig Securing Methods
Bobby Pinning It Down
Grab a set of bobby pins and add a little more security for your wig.
Lift up some of the hair from your lace front wig and stick a few bobby pins straight through the wefts of the wig and into your hair. Pin around the outsides of the wig and at your temples.
Try not to over pull you’re your edges or the hair you pin down. You don’t want to cause extra stress on your hair follicles.
Your hair needs love too!
Elastic Band Method
The elastic band method works best if you sew it onto the stocking cap, correctly.
It can be worn under any wig to make it more comfortable and secure. It is designed to hold your hair comfortably and securely in place.
It will feel much like you are wearing a headband. Make sure not to wrap the elastic band too tight around the perimeter of your head.
It can cause bald spots and headaches over time.

Double Sided Tape
That’s right! Go to your convenient local store or even a hair store, because some of them have the double-sided tape made for wig caps.
It is best to use in areas you do not have hair. Use the double-sided tape to secure your wig if you feel that it is moving around and you have no hair.
Place the tape anywhere inside the wig that you choose, or cut a piece in half if you don't need a full part.
It is less messy than glue and less time-consuming.
Metal Wig Clips
If you are a little crafty and you enjoy a few DIY's every once in a while, then this may be the method for you!
You can purchase these pretty much at any beauty supply store. You should sew the metal wig clips into the inside of your wig and then clip into your hair to keep your wig secure and in place.
If you aren’t sure how to sew, I suggest you either learn (YouTube knows it all) or take it to a stylist to do it for you.
The Question Is: Is It Worth It?
With all the trouble going into the dry time, the excess gel, the styling and making sure the wig looks as real as possible you may question if this process is worth the trouble.
That is really up for you to decide! The results are, and there is no denying it.
Most of the YouTube tutorials I have seen give results that present a perfectly laid lace front, so using this method may be a go.
But, there are other techniques out there where using a stocking cap method isn’t necessary.
If you don’t think you can put in all the effort, this may not be for you.
For those who believe that beauty takes time and patience, then go for it! Do you think using a stocking cap method is worth the trouble?
Do you think the stocking cap method is more secure than other methods? Have you already used a stocking cap method? Check out our wig blog for more tips and techniques.
Is this your first time hearing about it?
Leave a question or comment!
2 comments
Great post! The stocking cap method sounds like a lot of work, but the results seem worth it. I love how natural and secure it makes the wig look.
Using the stocking cap method seems like a detailed process! Has anyone experienced better results with this method compared to other wig securing techniques?